- Published on
Data Engineering Zoomcamp, Week 1 - Part 2
In my last blog post, we covered the first section of the Data Talks Club Week 1 module. This section walked us through pulling New York Taxi data from the web and ingesting into a PostgreSQL database using Python, Docker Containers and pgAdmin. If you missed it, be sure to take a look here.
In today's post, we will cover Terraform, which is an Infrastructure as Code (IaC) tool used to provision cloud resources, such as storage components and virtual machines, found on platforms like AWS, GCP, and Azure. The purpose of this post is to delve into further details regarding some concepts that I wish I had grasped earlier in my career: Environmental Variables, the System PATH, and Service Accounts.
You can find the specific Data Talks Club module I'll be discussing here. Be sure to star the repo as it helps support the Data Talks Club and all the amazing courses they have created!
You can also subscribe to their newsletter and join their slack channel by visiting https://datatalks.club/.
Now lets get into the Terraform module which involves the following steps:
- Creating a GCP Project for Terraform
- Configuring a GCP Service Account
- Download an API key for your Service Account
- Setting Up Google Cloud SDK
- System Path Setup for Windows
- Deploying Resources with Terraform
- Finalizing and Cleaning Up Your Deployment
- Looking Ahead
Creating a GCP Project for Terraform
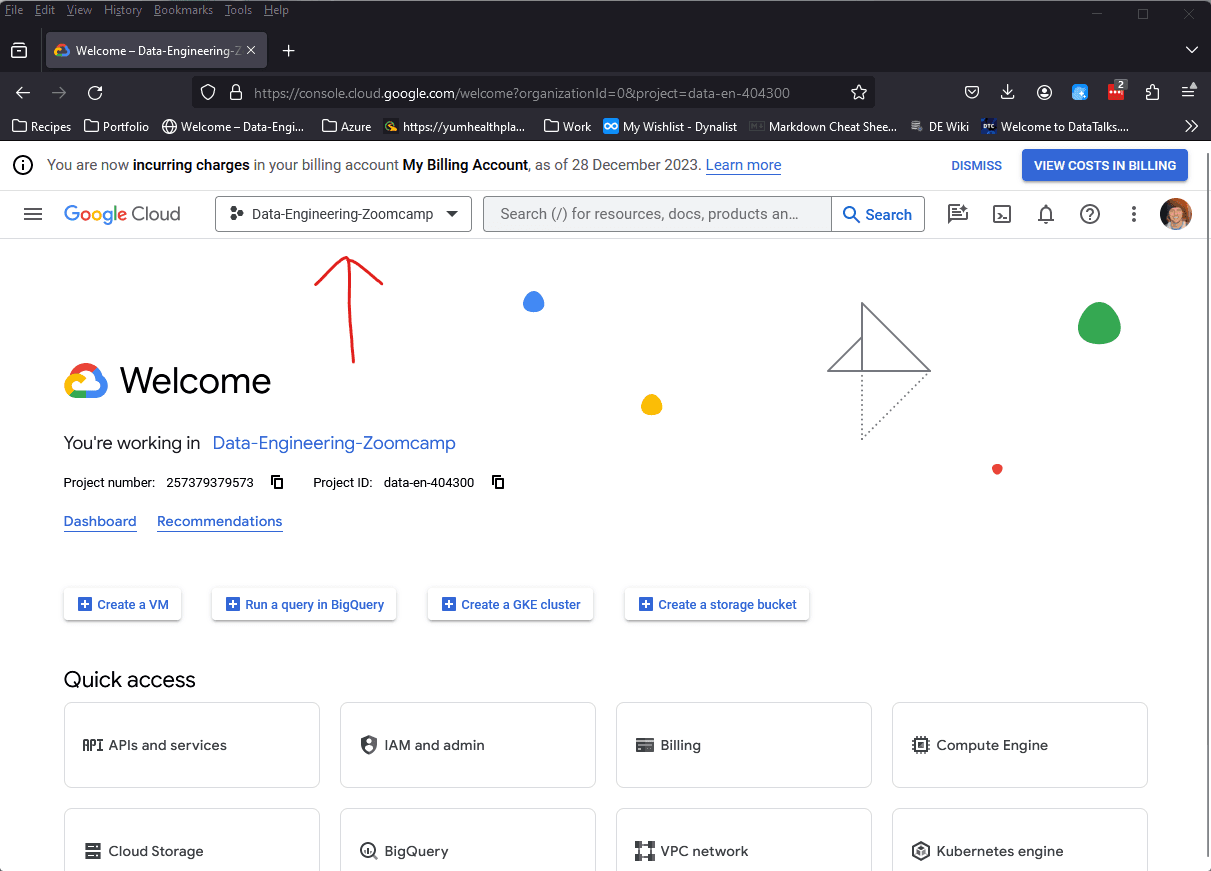
The first step is to create a new Project in the Google cloud console by selecting the drop down list then click the "New Project" button:
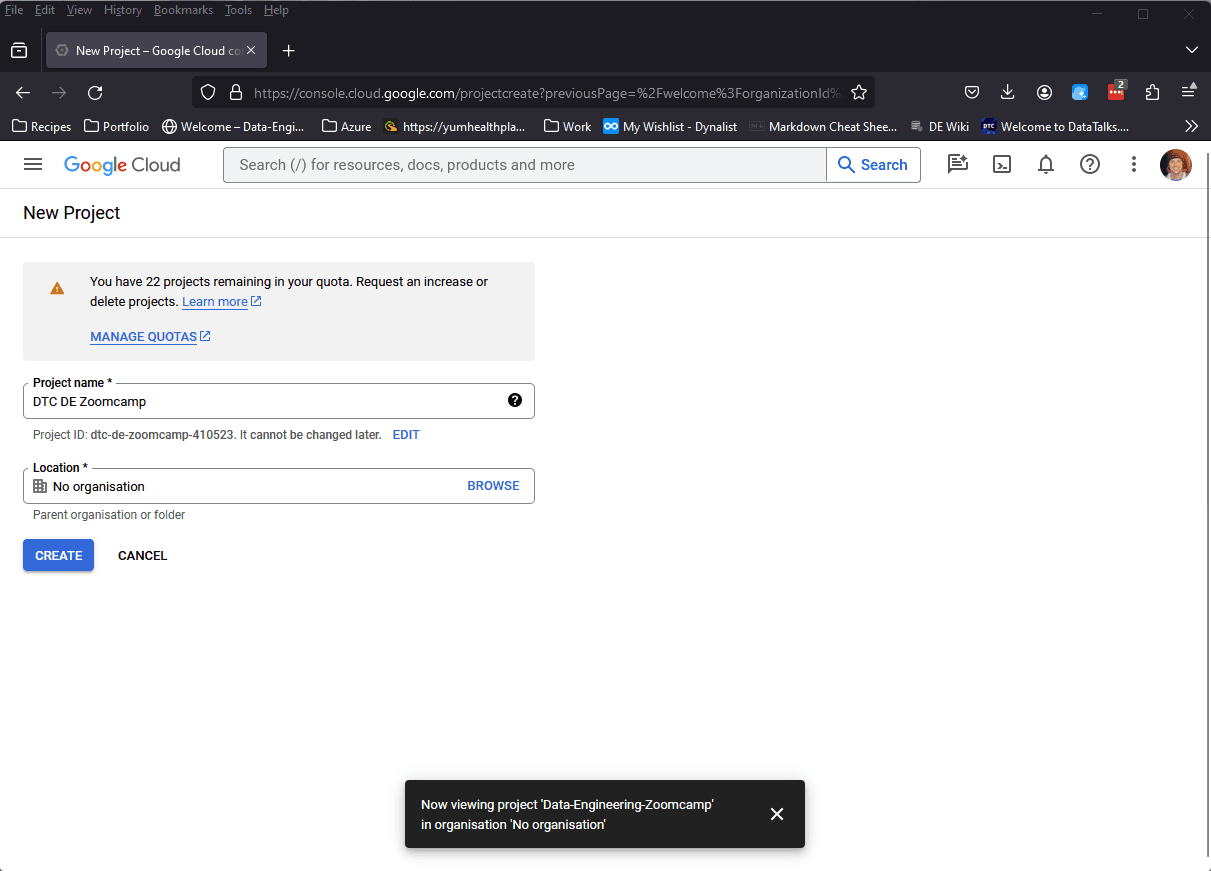
From here, you can name your project something like DTC DE Zoomcamp.
Configuring a GCP Service Account
Now that our project is created, we need to set up our service account. Unlike user accounts, which are designed for individuals, service accounts are non-human accounts created specifically for applications. This approach is beneficial for several reasons. Service accounts enable the assignment of specific permissions tailored to an application's needs. They enhance security by being independent of individual user accounts, and GCP handles their token expiration and renewal automatically. This autonomy makes them a secure and efficient choice for scenarios such as automated workflows, CI/CD pipelines, or applications running on virtual machines, where minimal human intervention is desired.
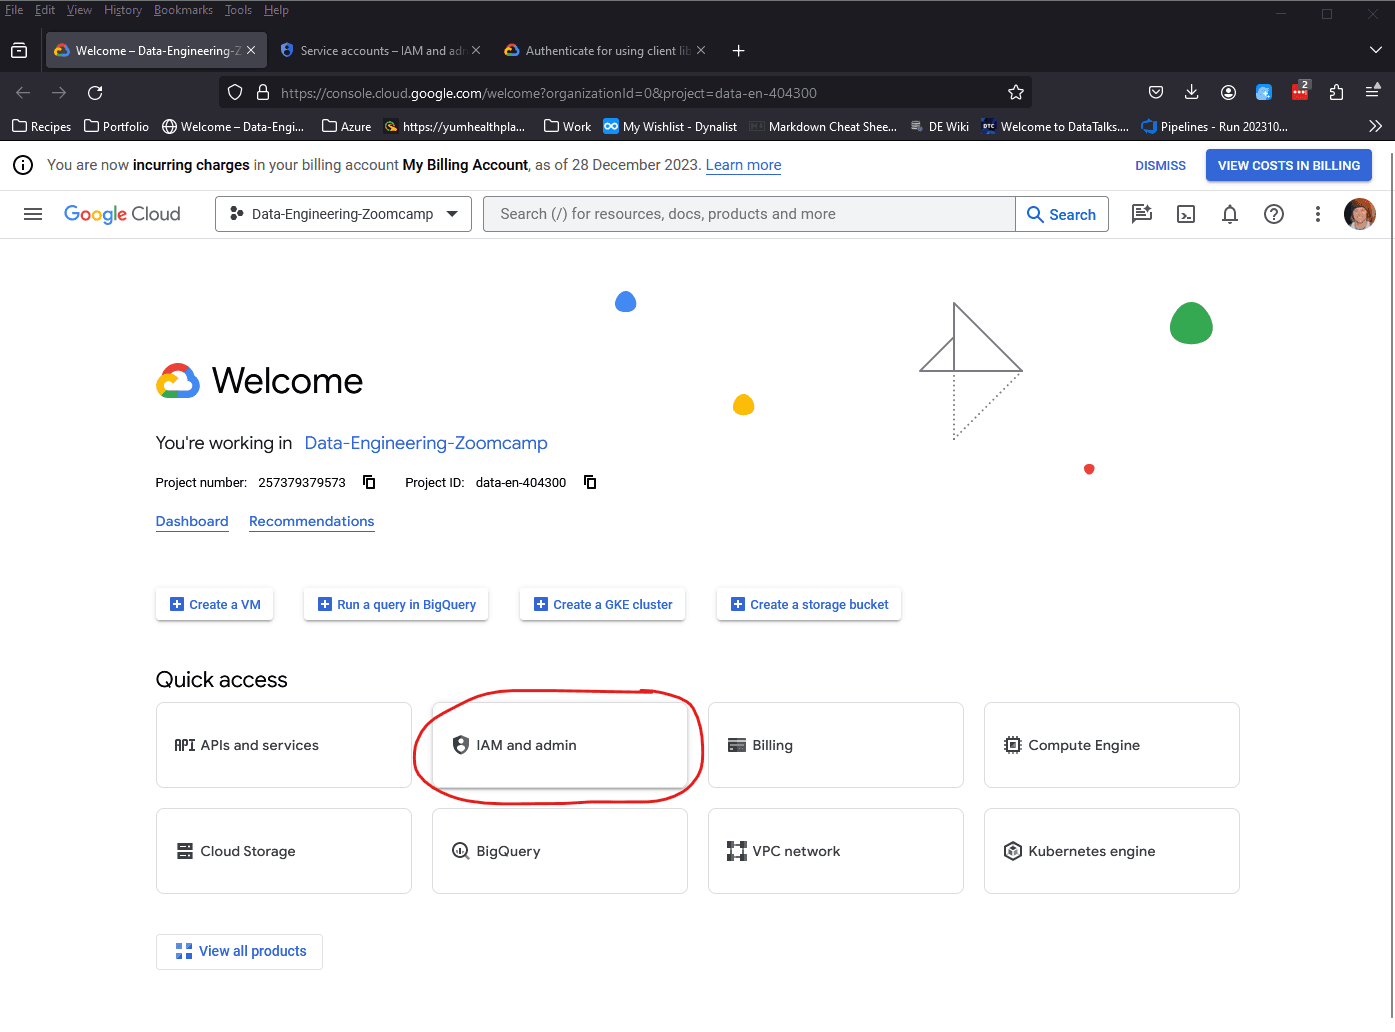
To create a service account, you'll need to select IAM and Admin on the project home screen.
To read more on service accounts, check out this google documentation.
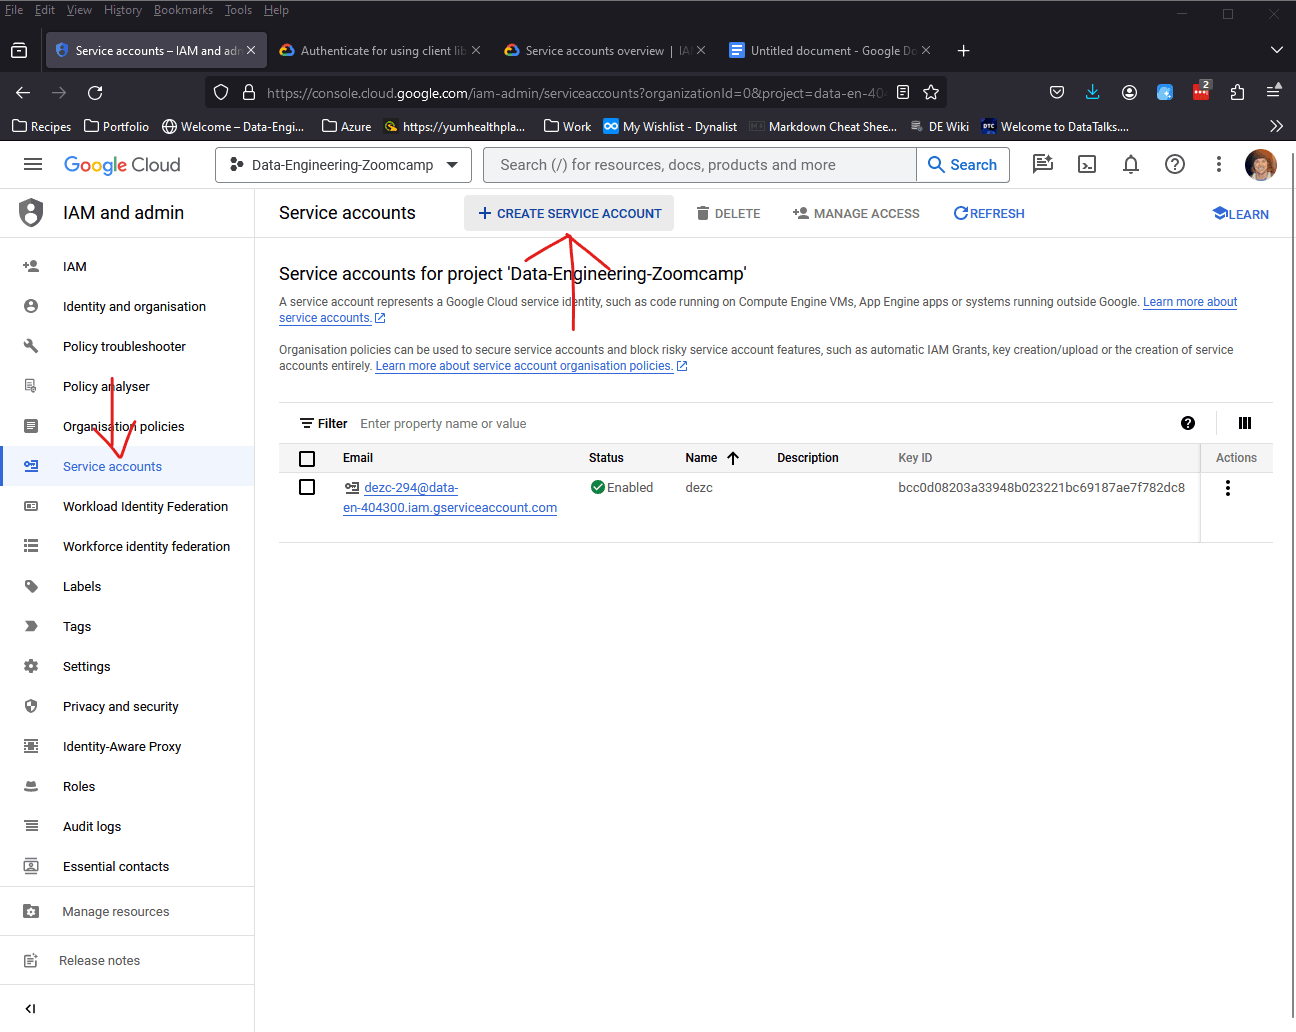
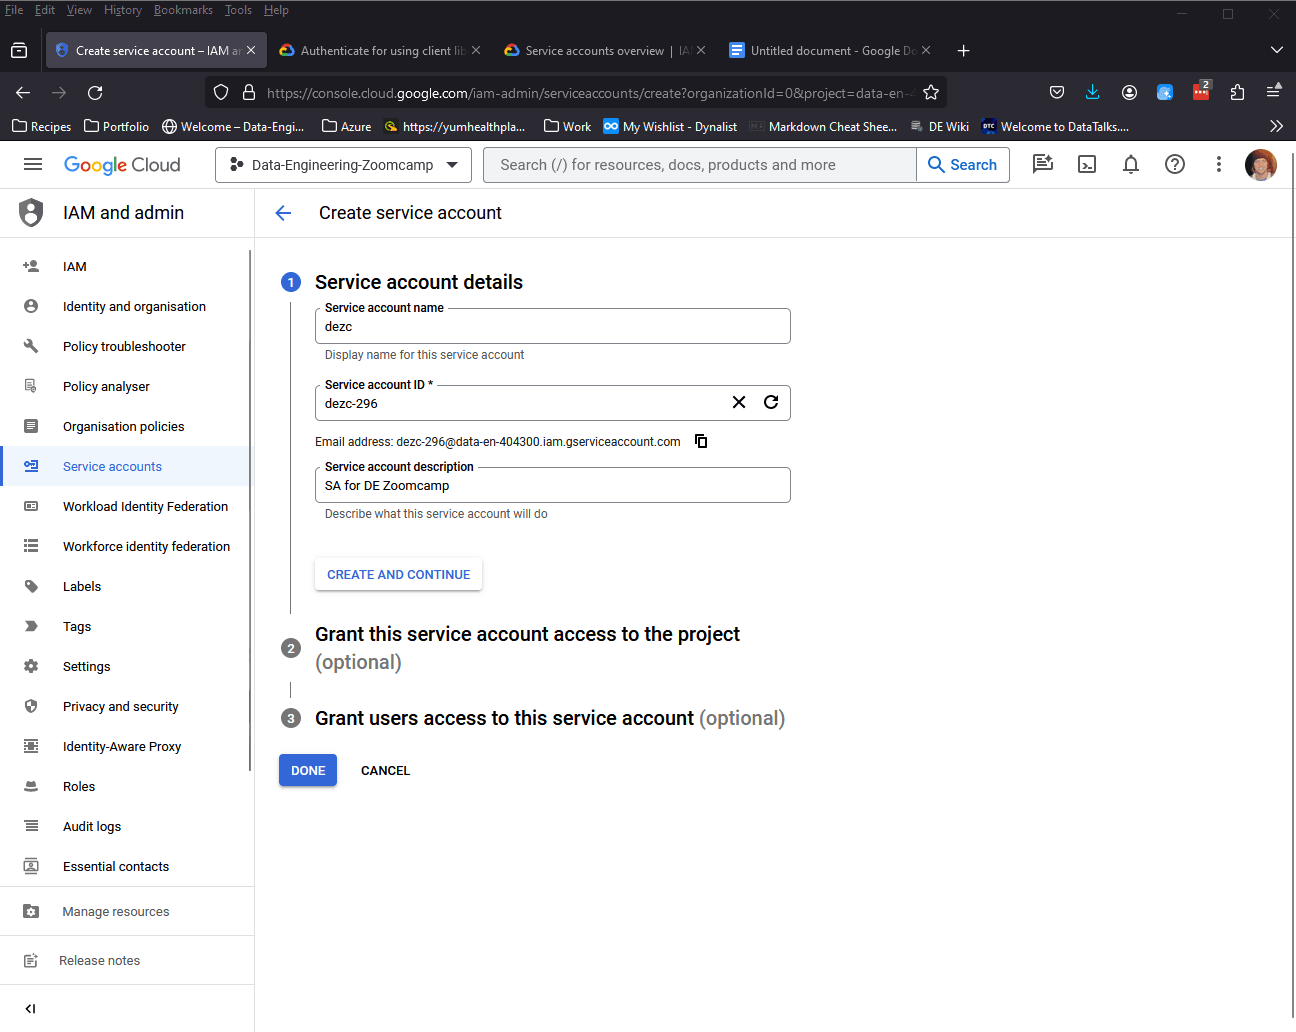
Here you will want to name your service account and click create and continue.
Now that we've named our service account, we will want to grant it the following roles:
- Viewer
- Storage Admin
- Storage Object Admin
- Big Query Admin
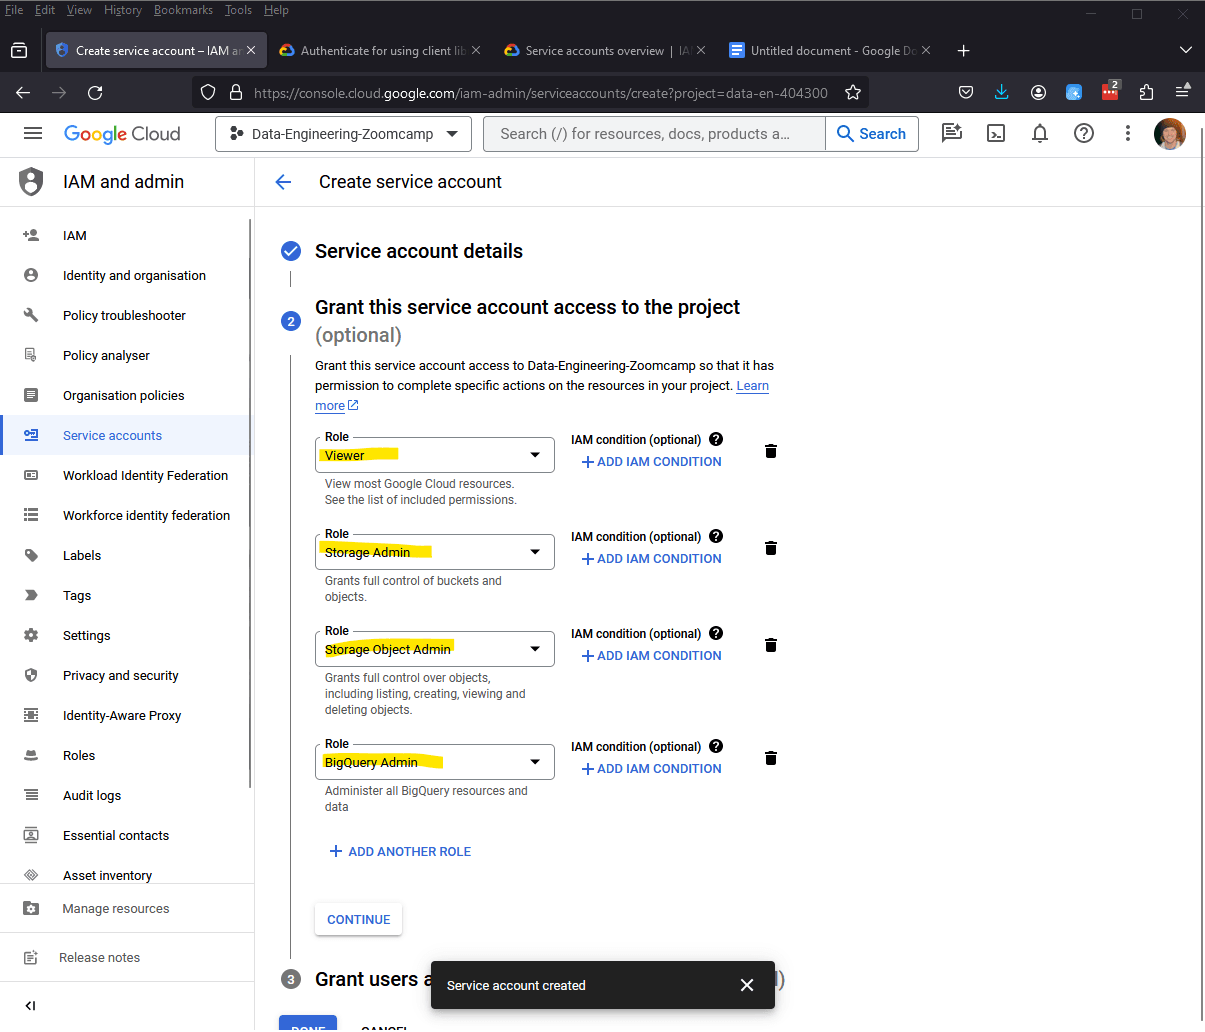
This can all be done on the Service Account creation form, but if you missed it, you can add these roles to the service account here.
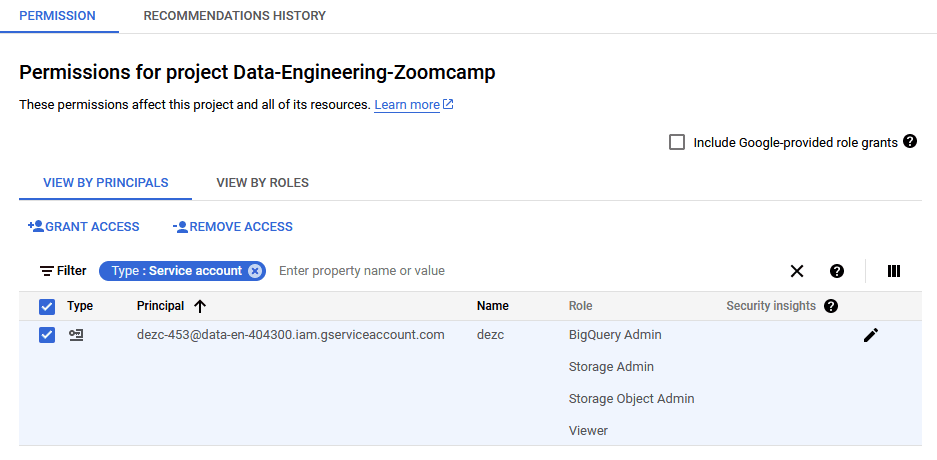
Your account should look as follows:
Download an API key for your Service Account
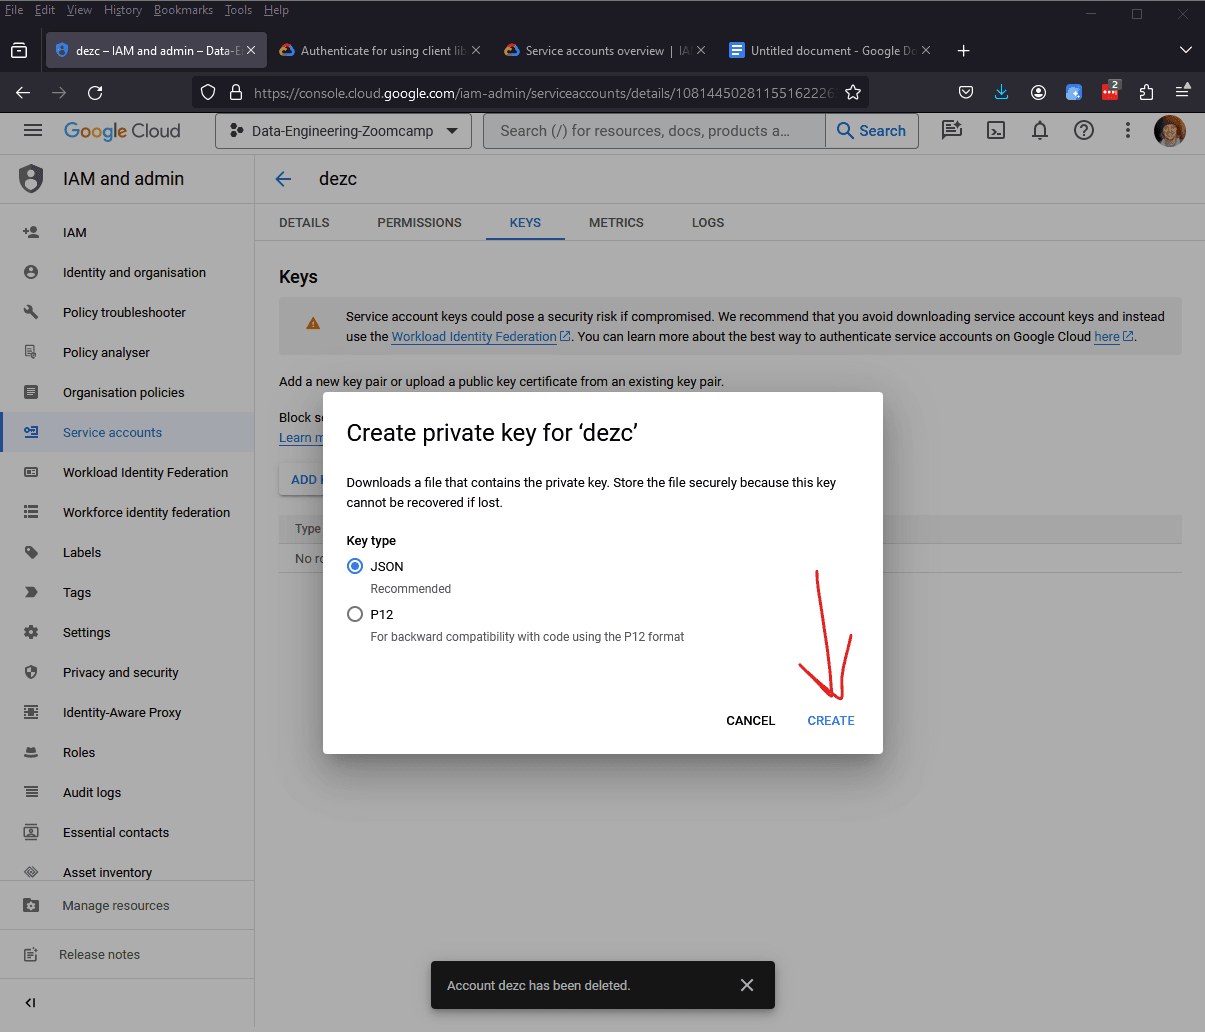
Now that our service account is configured with the necessary roles, we now need to download our API keys for the account. You can create an API key by right clicking the 3 ellipses under the Actions column of your service account and selecting Manage Keys.
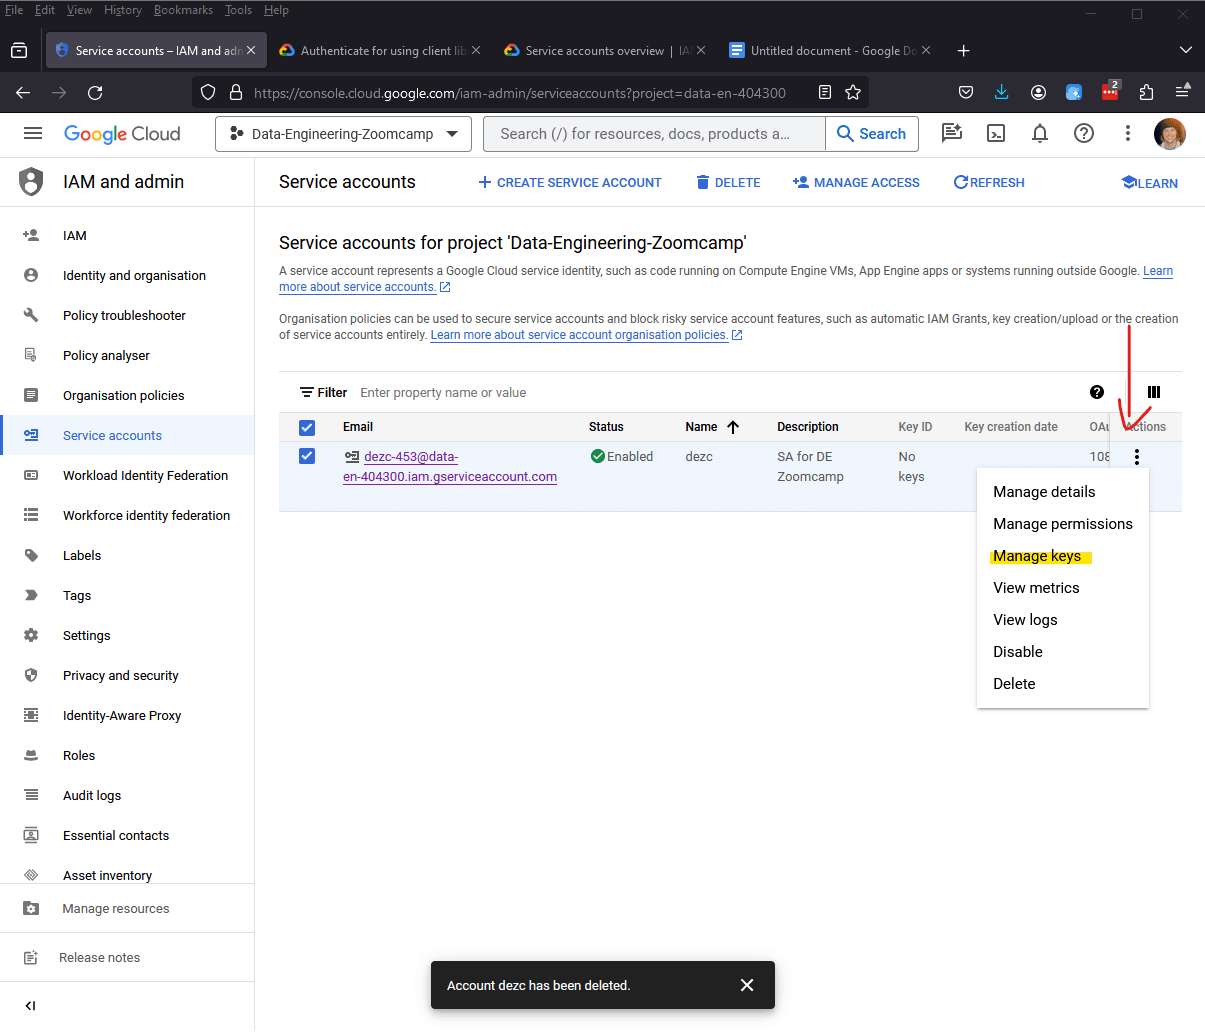
From here, you will select JSON and then press CREATE. This will download a JSON file containg the API keys, which will allow us to then authenticate with the Google Cloud Shell and create our resources using Terraform.
Setting Up Google Cloud SDK
Before we can begin using Terraform, we must first install the Google Cloud SDK. If you haven't already, you can download it here.
Once it has completed downloading, be sure to move it to a proper folder. In my case, I moved mine to C:\Tools. You can move it to wherever you like, just be sure to remember where it's located.
System Path Setup for Windows
Adding an application to the system path may be simple concept to some, but for me it was longer than I'd like to admit before I realized what this actually did. Before we can run any Terraform commands, we must authenticate to GCP with our Service Account. We do this by running the command gcloud auth application-default login in the Google Cloud SDK terminal. If you were to run that same command in the Windows CLI, you'll notice that conmmand will not be recognized. Well, at least not initially. Why is that? This is because we haven't made our system aware of where the Google Cloud SDK executable is located. This is what adding gcloud to our system path does.
For example, I've installed the Google Cloud SDK in the following location: C:\Tools\google-cloud-sdk\. Now that it's installed, we will weed to open Environmental Variables under our System Properties. An easy way to do this is to press the Windows key and search Environmental Variables and there should be an option that says edit the system environmental variables. Select this and you should see the following: 
Environmental Variables at the bottom and you should now see a list of system variables, including your Path: 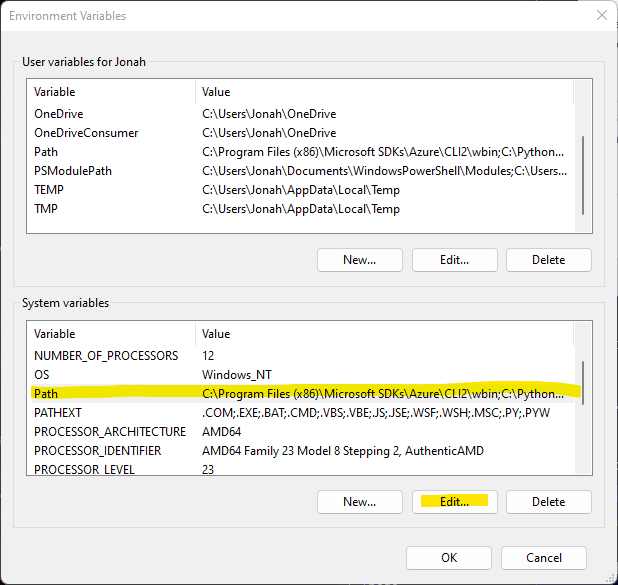
Now click Edit and we will want to add the location of our Google Cloud Shell to the System Path. Mine is located in C:\Tools\google-cloud-sdk\ but this is not the Path we need to add. We need to add C:\Tools\google-cloud-sdk\Cloud SDK\google-cloud-sdk\bin which is the location of the Google Cloud executable scripts that we need to run our gcloud shell commands.
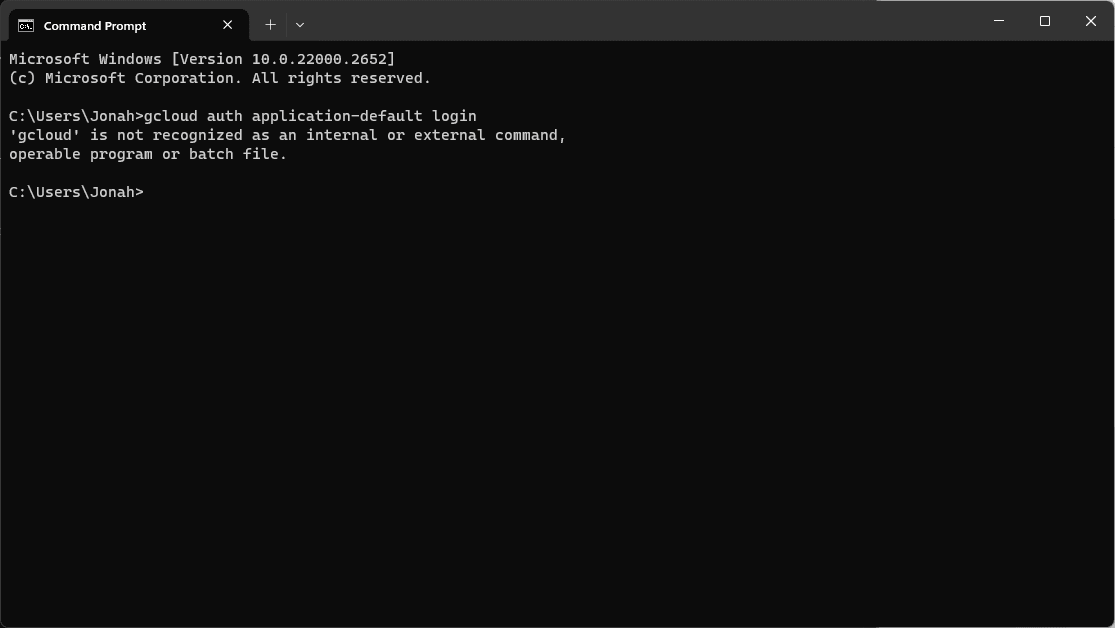
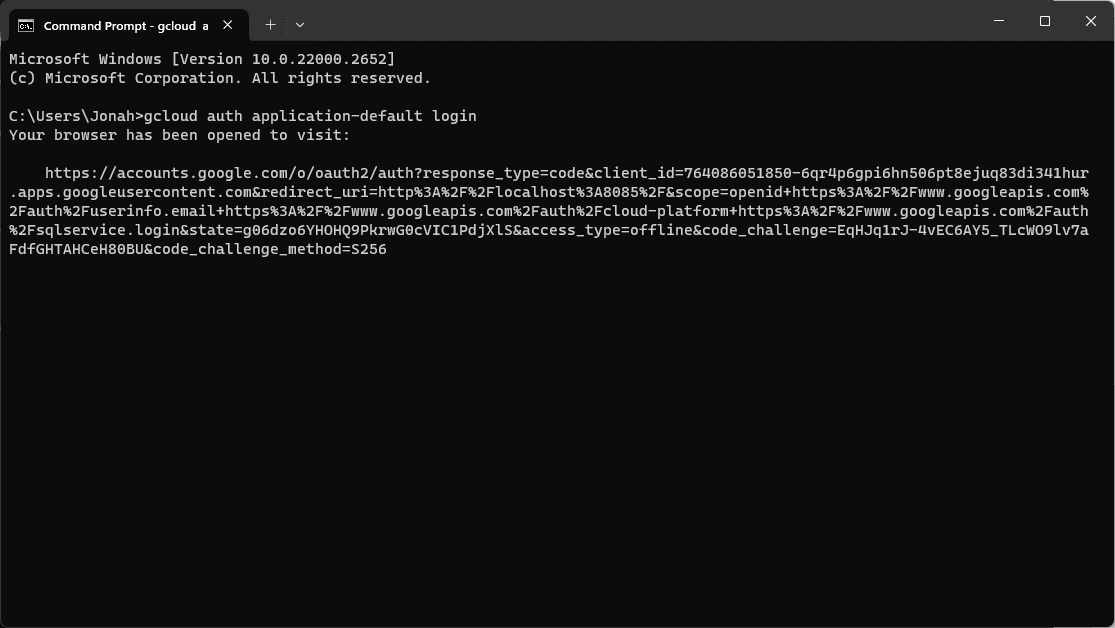
This also applies to other tools and applications such as Python, AWS Cloud Shell, PIP, etc. It may seem simple, but I went a handful of years not having know about the system path.
Deploying Resources with Terraform
Now that we've configured our Service Account, download our API Keys and the Google Cloud SDK, we can use Terraform to setup our cloud resources!
First, you'll need to open a command terminal. Once the terminal is open, you'll need to run the following command to set an environmental variable that will store our GCP API Credentials.
Set GOOGLE_APPLICATION_CREDENTIALS="path\to\your\gcp\credentials.json"
Now you will need to change directories to week_1_basics_n_setup/1_terraform_gcp/terraform_with_variables
This is the directory that contains two files:
main.tfvariables.tf
variables.tf is where we set variables such as project id and credentials amongst a handful of others. We will need to make a few adjustments to this file, specifically we will want to set the default values of both the credentials & project variables and modify the gcs_storage_class variable.
I copied my JSON API keys into the week_1_basics_n_setup/1_terraform_gcp/terraform_with_variables directory, which allowed me to set the default value to simply the name of the JSON file, which should be named something like your project name followed by a series of numbers: data-en-1234-5678.json. Otherwise you will need to set the default to the full path where you have downloaded/stored your JSON key.
The project variable we simply need to set as the project ID of your Google Cloud project. My project name is Data-Engineering-Zoomcamp and the project ID would be something like data-en-123456.
Lastly, you will need to update the default value for the gcs_bucket_name variable as it needs to be a globally unique bucket name, meaning it cannot share a name with an existing bucket someone has already created. I simply added a 1 to the end of terraform-demo-terra-bucket changing it to terraform-demo-terra-bucket-1 and I was able to successfully run my terraform code.
Update these variables in the variables.tf shown below and we are now ready to run our Terraform code!
variable "credentials" {
  description = "My Credentials"
  default     = "<Path to your Service Account json file>"
  #ex: if you have a directory where this file is called keys with your service account json file
  #saved there as my-creds.json you could use default = "./keys/my-creds.json"
}


variable "project" {
  description = "Project"
  default     = "<Your Project ID>"
}

variable "region" {
  description = "Region"
  #Update the below to your desired region
  default     = "us-central1"
}

variable "location" {
  description = "Project Location"
  #Update the below to your desired location
  default     = "US"
}

variable "bq_dataset_name" {
  description = "My BigQuery Dataset Name"
  #Update the below to what you want your dataset to be called
  default     = "demo_dataset"
}

variable "gcs_bucket_name" {
  description = "My Storage Bucket Name"
  #Update the below to a unique bucket name
  default     = "terraform-demo-terra-bucket"
}

variable "gcs_storage_class" {
  description = "Bucket Storage Class"
  default     = "STANDARD"
}
The main.tf file defines our resources and references the variables we defined in variables.tf.
terraform {
  required_providers {
    google = {
      source  = "hashicorp/google"
      version = "5.6.0"
    }
  }
}

provider "google" {
  credentials = file(var.credentials)
  project     = var.project
  region      = var.region
}

resource "google_storage_bucket" "demo_bucket" {
  name          = var.gcs_bucket_name
  location      = var.location
  force_destroy = true

  lifecycle_rule {
    condition {
      age = 1
    }
    action {
      type = "AbortIncompleteMultipartUpload"
    }
  }
}

resource "google_bigquery_dataset" "demo_dataset" {
  dataset_id = var.bq_dataset_name
  location   = var.location
}
Now lets run our code! Go to your terminal and make sure you are in the same directory as your main.tf file before running the following in sequential order:
# Initialize state file (.tfstate)
terraform init

# Initialize state file (.tfstate)
terraform plan

# Check changes to new infra plan
terraform apply
I will note in the Zoomcamp, we pass in the project variable when running the terraform commands, but since we set the project id as a default value, you do not need to perform this, but it is important to note you can pass through variables.
Also, I'm not sure the it is 100% necessary to authenticate with the Google Cloud Shell, as I noticed it defaults to OAuth instead of using our JSON keys, but I believe since we defined the credentials variable with our API Key, it may be redundant.
# Refresh service-account's auth-token for this session
gcloud auth application-default login

# Initialize state file (.tfstate)
terraform init

# Check changes to new infra plan
terraform plan -var="project=<your-gcp-project-id>"

# Apply your changes
terraform apply -var="project=<your-gcp-project-id>"
Finalizing and Cleaning Up Your Deployment
After we run our code, you should see some confirmation in the terminal as well as your new Storage Bucket and Big Query demo dataset in your GCP Project.
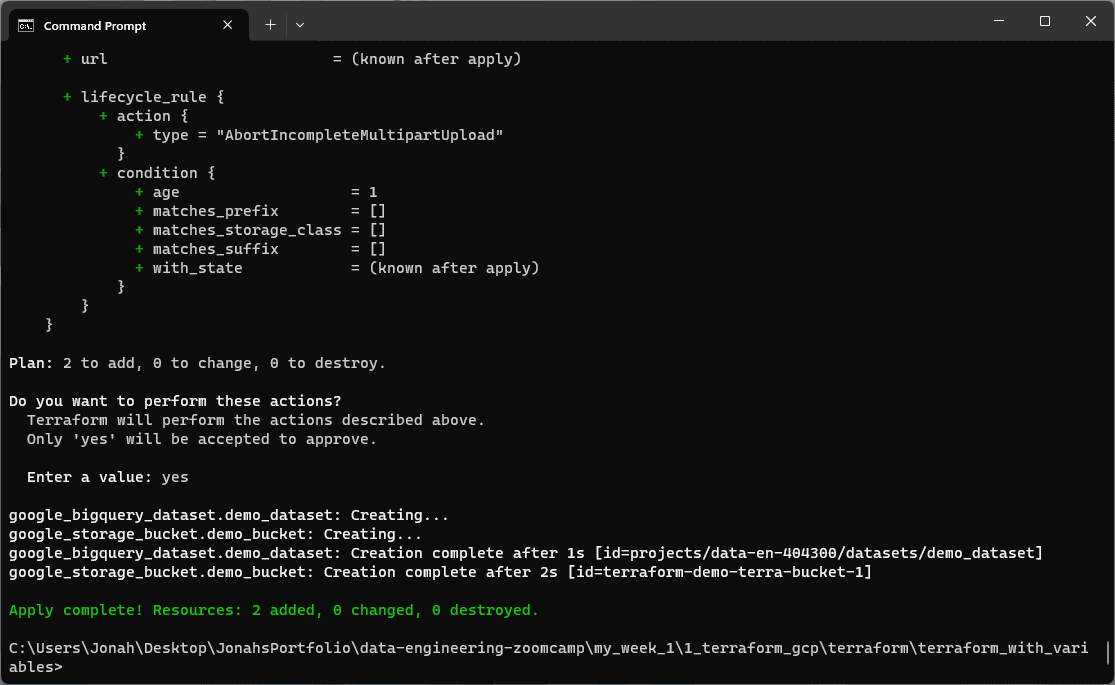
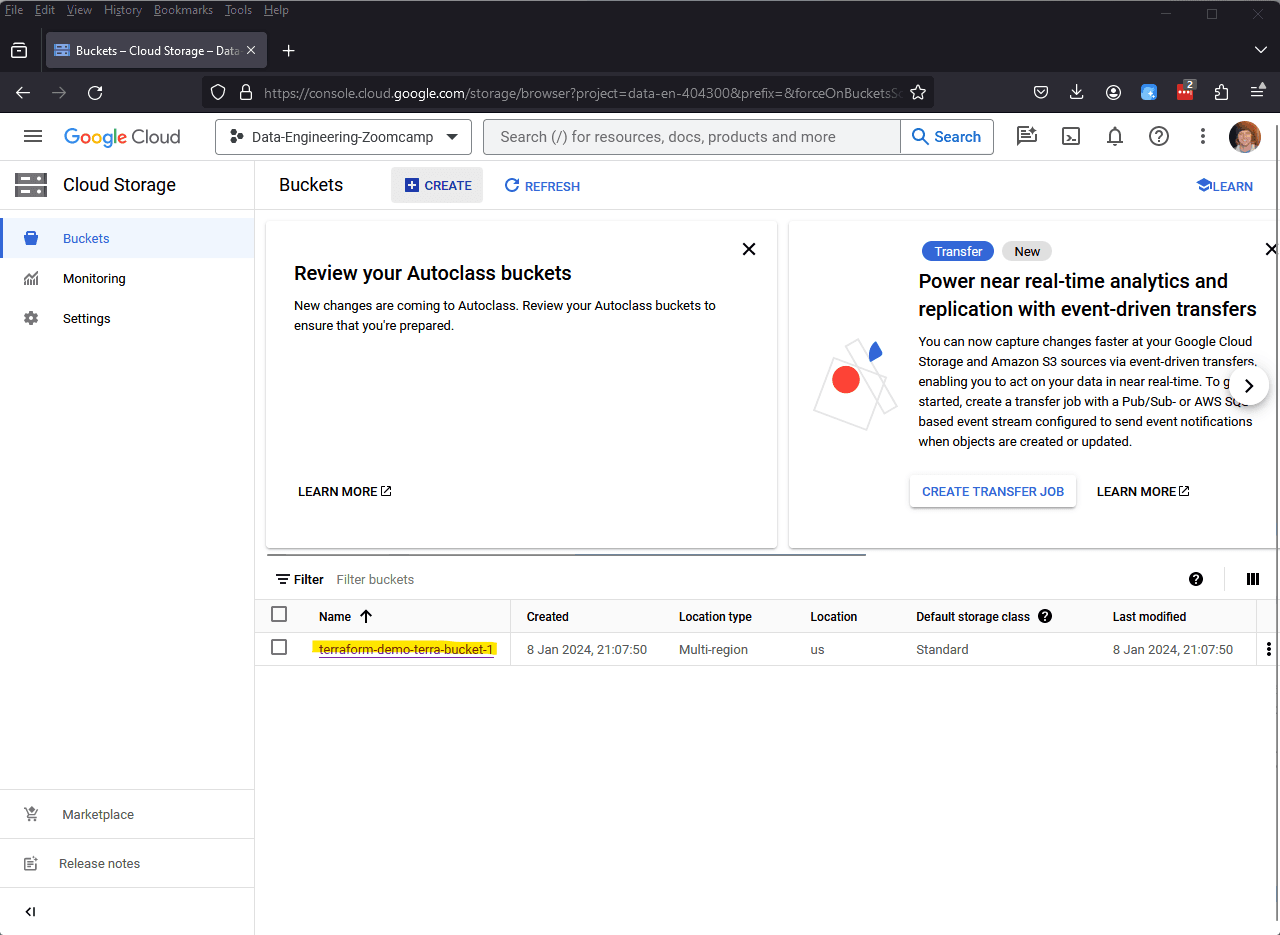
Finally, don't forget to run terraform destroy to delete the resources after you are finished!
# Delete infra after your work, to avoid costs on any running services
terraform destroy
Looking Ahead
Thanks for reading and I truly hope this helped if you ran into any issues with this module. In the upcoming weeks, I'll be diving into Week 2, which focuses on Workflow Orchestration with Mage. My intent is to continue sharing my thoughts in future posts and I'm looking forward to exploring this next chapter with you all!